for Robot Artificial Inteligence

MS round2 준비

|

처참하게 코딩테스트에 떨어졌다. 예견했던 일이다. 그만큼 준비도 안되있고 연습도 안해보았으니. 어찌 첫술에 배부르랴. 하지만 마이크로소프트 리크루팅 팀에서 다른 직위의 Job Offer를 주었다.

흐음 이 직책은 어찌 되었건 예전에 다닌던 회사 CS업무하고 비슷한거 같다. MS 면접 기회를 받은것도 어디인가, 어떤 직위이건 좋은 경험이 될거 같아 면접 준비하기로 했다.

면접에는 기술면접 2번, 합격을 하면 매니저 면접이 있다.

인터넷을 조사한 결과 기술면접에 질문들은 대략

  • 영어 자기소개
  • 프로젝트 경험
  • 이력서 기준으로 질문

이렇게 되는 거 같다. 소프트웨어 직군 같은경우 위에 질문에 추가로 Algorith 문제 푸는 질문은 한다는데 Support Engineer은 그런것이 없는 것 같다.

주로 글로벌 커스터머 상대다 보니 영어에 대한 질문이 많고, Trouble Shooting에 대한 Process와

유투브나 인터넷에서 조사한 것을 보면 극한의 상황에 대한 질문도 주어진다고 한다. 예를 들어

  • 나의 할일은 꽉 차있고, 업무도 마무리 못했는데, 팀메이트들이 회의를 하자고 한다. 갈것인가 말것인가 등

곤란한 질문을 한다고 한다. 아마 단체 팀워크에 맞는지에 관한 질문들을 하는 것 같다.

Comment  Read more

1. ORB_SLAM2 코드 분석

|

1. ORB_SLAM2 구조

주요 코드

  • Tracking.cpp
  • LocalMapping.cpp
  • LoopClosing.cpp
  • Viewer.cpp
  • 변수 이름 규칙:
    • “P” : 포인터 유형
    • “n” : int
    • “b” : bool
    • ”s” : set
    • “v” : vector 유형
    • ‘l’ : list 유형
    • “m” : member 변수

2. SYSTEM 구조:

  • Note: MpiniORBextractor는 mpORBextractorLeft보다 2배 정도 특정점을 얻는다.

3. Tracking 과정:
  • Note: mbOnlyTracking기본 설정으로 False, 사용자 스스로 Tracking 위치 모드를 고를수 있다.

4. LocalMapping 과정:

5. LocalClosing 과정:

  • Note: 아래 그래프는 []검사에서 Close loop 후보 프레임이 감지됨] 파트

6. LocalClosing 과정(Sim3계산):

7. LocalClosing 과정(CorrectLoop):

8. Frame.cpp

9. Initializer.cpp

  • https://en.wikipedia.org/wiki/Homography_(computer_vision)

10. Tracking.cpp

11. ORBmatcher.cpp

12. Optimizaer.cpp

13. Reference

https://github.com/fangdefuo/orb_slam_detailed_explanation.git 틀린 것 댓글 달아주시면 수정하겠습니다.

Comment  Read more

1. Queue Stack (Queue and BFS)

|

1. Introduction

  • We may access a random element by index in Array. However, we might want to restrict the processing order in some cases.
  • we introduce two different processing orders, First-in-First-out and Last-in-First-out and its two corresponding linear data structures, Queue and Stack.
  • We go through the definition, implementation and built-in functions for each data structure.
  • Then, we focus more on the practical applications of these two data structures.
  • By completing this card, you should be able to:
    • Understand the principle of the processing orders of FIFO and LIFO
    • Implement these two data structures
    • Be familiar with the built-in queue and stack structure
    • Solve basic queue-related problems, especially BFS(Breadth-Frist Search)
    • Solve basic stack-related problems problems
    • Understand how system stack helps you when you solve problems using DFS(Depth-First Search) and other recursion algorithms

2. Queue and BFS

  • One common application of Breadth-first Search (BFS) is to find the shortest path from the root node to the target node.
  • In this article, we provide an example to explain how queue is applied in a BFS algorithm step by step.

Example Here we provide an example to show how BFS is used to find the shortest path between the root node A and the target node G.

video

3. Insights

  • After watching the animation above, let’s answer the following questions:
    • What is the processing order of the nodes?
      • In the first round, we process the root node. In the second round, we process the nodes next to the root node; in the third round, we process the nodes which are two steps from the root node; so on and so forth.
      • Similar to tree’s level-order traversal, the nodes closer to the root node will be traversed earlier.
      • If a node X is added to the queue in the kth round, the length of the shortest path between the root node and X is exactly k.
      • That is to say, you are already in the shortest path the first time you find the target node.
    • What is the enqueue and dequeue order of the queue?
      • As shown in the animation above, we first enqueue the root node.
      • Then in each round, we process the nodes which are already in the queue one by one and add all their neighbors to the queue.
      • It is worth noting that the newly-added nodes will not be traversed immediately but will be processed in the next round.
      • The processing order of the nodes is the exact same order as how they were added to the queue, which is First-in-First-out (FIFO). That’s why we use a queue in BFS.

4. BFS - Template

  • Previously, we have already introduced two main scenarios of using BFS:
    • traversal or find the shortest path.
  • Typically, it happens in a tree or a graph. As we mentioned in the chapter description, BFS can also be used in more abstract scenarios.
  • In this article, we will provide you with a template. Then, we provide some exercise after this article for practice.
    • It will be important to determine the nodes and the edges before doing BFS in a specific question
    • Typically, the node will be an actual node or a status while the edge will be an actual edge or a possible transition.

Example(walls and gates)

  • You are given a m x n 2D grid initialized with these three possible values.
    • -1 - A wall or an obstacle.
    • 0 - A gate.
    • INF - Infinity means an empty room. We use the value 231 - 1 = 2147483647 to represent INF as you may assume that the distance to a gate is less than 2147483647.
  • Fill each empty room with the distance to its nearest gate. If it is impossible to reach a gate, it should be filled with INF.

map

  • Given the 2D grid
INF  -1  0  INF
INF INF INF  -1
INF  -1 INF  -1
  0  -1 INF INF
  • After running your function, the 2D grid should be:
3  -1   0   1
2   2   1  -1
1  -1   2  -1
0  -1   3   4
  • Understand the problem:
    • It is very classic backtracking problem. We can start from each gate (0 point), and searching for its neighbors. We can either use DFS or BFS solution.
class Solution {
public:
    void wallsAndGates(vector<vector<int>>& rooms) {
        if (rooms.empty()) return;
        int m = rooms.size(), n = rooms[0].size();
        queue<pair<int, int>> q;
        for (int i = 0; i < m; i++) {
            for (int j = 0; j < n; j++) {
                if (!rooms[i][j]) q.push({i, j});
            }
        }

        for (int d = 1; !q.empty(); d++) {
            for (int k = q.size(); k; k--) {
                int i = q.front().first, j = q.front().second;
                q.pop();
                add(rooms, q, i - 1, j, m, n, d);
                add(rooms, q, i + 1, j, m, n, d);
                add(rooms, q, i, j - 1, m, n, d);
                add(rooms, q, i, j + 1, m, n, d);
            }
        }
    }
private:
    void add(vector<vector<int>> &rooms, queue<pair<int, int>> &q, int i, int j, int m, int n, int d) {
        if (i >= 0 && i < m && j >= 0 && j < n && rooms[i][j] > d) {
            q.push({i, j});
            rooms[i][j] = d;
        }
    }

};

vector<vector>

  • vector of vectors of int as follows:
vector<vector<int>> v;
  • above definition results in an empty two-dimensional vector.
  • in order to use it, we have to define vector size and allocate storage for its elements.
  • there are several methods to grow a two-dimensional vector with help of resize() or push_back() functions or using the fill constructor or initializer lists.
  1. resize() function
    • the resize() function is used to resize a vector to the specified size. we can use it to initialize a vector of vectors as shown below
#include <iostream>
#include <vector>
using namespace std;

#define R 4
#define C 5

int main()
{
	// instantiate a vector of R objects of type vector<int>
	// and resize each object to size C
	vector<vector<int>> mat(R);
	for (int i = 0 ; i < R ; i++)
		mat[i].resize(C);

	// print the vector

	return 0;
}
  • we can picture a vector of vectors as a two-dimensional array consisting of R rows and C columns. here’s alternative version of above code which uses overloaded version of the resize() function which accepts the container size, and the object to be copied in that container
#include <iostream>
#include <vector>
using namespace std;

#define R 4
#define C 5

int main()
{
	// instantiate vector object of type vector<int>
	vector<vector<int>> mat;

	// resize the vector to R elements of type vector<int>, each having size C
	mat.resize(R, std::vector<int>(C));

	// print the vector

	return 0;
}
  1. push_back() function
    • another plausible way of initializing a vector of vectors is to use the push_back() function which adds a given element at the end of the vector.
#include <iostream>
#include <vector>
using namespace std;

#define R 4
#define C 5

int main()
{
	// instantiate vector object of type vector<int> and
	// use push_back() function to resize it
	vector<vector<int>> mat;
	for (int i = 0; i < R; i++)
	{
		// construct a vector of int
		vector<int> v;
		for (int j = 0; j < C; j++)
			v.push_back(0);

		// push back above one-dimensional vector
		mat.push_back(v);
	}

	// print the vector

	return 0;
}

result

0 0 0 0 0
0 0 0 0 0
0 0 0 0 0
0 0 0 0 0
  • note when dimensions R and C are Large, above code suffers from potential performance penalties caused by frequent re-allocation of memory by push_back() function.
  • this should be used only when vector dimensions are not known in advance
  1. Fill Constructor
    • the recommended approach is to use fill constructor of the vector container for constructing a vector of vectors. the fill constructor accepts an initial size n and a value and creates a vector of n elements and fills with the specified default value
#include <iostream>
#include <vector>
using namespace std;

#define R 4
#define C 5

int main()
{
	// Using the fill constructor to construct a vector of vectors
	vector<vector<int>> mat(R, vector<int>(C));

	// print the vector

	return 0;
}
  • we can split above initialization into two parts
    • first initialize a vector of ints and then use this vector to initialize the vector of vectors using the fill constructor.
#include <iostream>
#include <vector>
using namespace std;

#define R 4
#define C 5

int main()
{
	// first initialize a vector of int
	vector<int> v(C);

	// Use above vector to initialize the vector of vectors
	// using the fill constructor
	vector<vector<int>> mat(R, v);

	// print the vector

	return 0;
}

result

0 0 0 0 0
0 0 0 0 0
0 0 0 0 0
0 0 0 0 0
  1. Initializer list
    • Finally, we can use initializer list introduced with c++11 to construct a vector of vectors as shown
#include <iostream>
#include <vector>
using namespace std;

int main()
{
	// using an initializer list to construct a vector of vectors
	vector<vector<int>> mat {
				{ 0, 0, 0, 0, 0 },
				{ 0, 0, 0, 0, 0 },
				{ 0, 0, 0, 0, 0 },
				{ 0, 0, 0, 0, 0 }
			};

	// print the vector

	return 0;
}

Comment  Read more

1. Queue Stack(First in First Out data)

|

1. Introduction

  • We may access a random element by index in Array. However, we might want to restrict the processing order in some cases.
  • we introduce two different processing orders, First-in-First-out and Last-in-First-out and its two corresponding linear data structures, Queue and Stack.
  • We go through the definition, implementation and built-in functions for each data structure.
  • Then, we focus more on the practical applications of these two data structures.
  • By completing this card, you should be able to:
    • Understand the principle of the processing orders of FIFO and LIFO
    • Implement these two data structures
    • Be familiar with the built-in queue and stack structure
    • Solve basic queue-related problems, especially BFS(Breadth-Frist Search)
    • Solve basic stack-related problems problems
    • Understand how system stack helps you when you solve problems using DFS(Depth-First Search) and other recursion algorithms

2. Queue: First-in-first-out Data Structure

  • The goal of this is to help you
    • Understand the definition of FIFO and queue
    • Be able to implement a queue by yourself
    • Be familiar with the built-in queue structure
    • Use queue to solve simple problems

First-in-first-out Data Structure

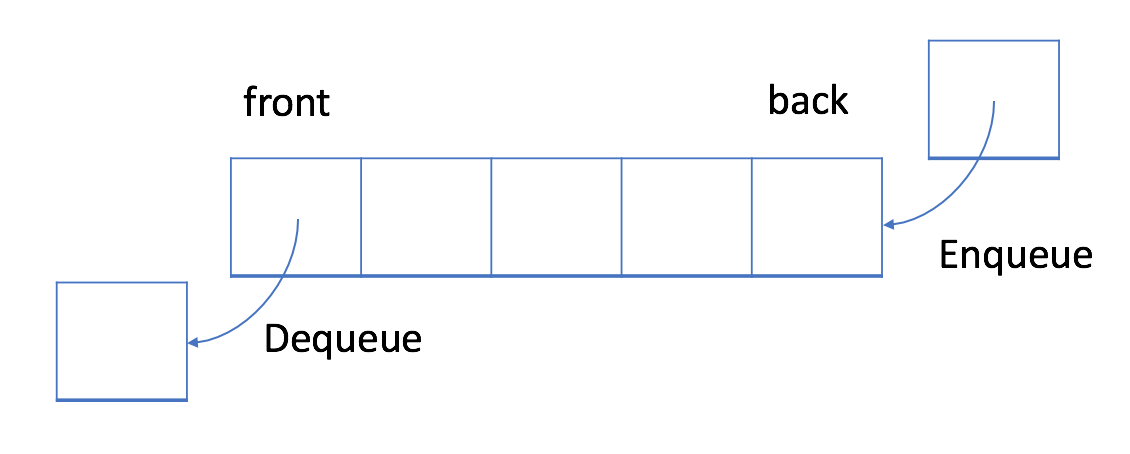
  • In a FIFO data structure, the first element added to the queue will be processed first.
  • As shown in the picture above, the queue is a typical FIFO data stucture. The insert operation is also called enqueue(排队) and the new element is always added at the end of the queue.
  • The delete operation is called dequeue.
  • you are only allowed to remove the first element

Exampe - Queue

  1. Enqueue: you can click Enqueue below to see how a new element 6 is added to the queue.

<img src=”https://i.postimg.cc/tTTfwGV3/screen-shot-2018-05-02-at-172840.png” width=”500px”

  1. Dequeue: you can click Dequeue below to see which element will be removed.

<img src=”https://i.postimg.cc/zDdWqZHL/screen-shot-2018-05-02-at-175409.png” width=”500px”

Circular Queue

  • Previously, we have provided a straightforward but inefficient implementation of queue.
  • A more efficient way is to use a circular queue. Specifically, we may use a fixed-size array and two pointers to indicate the starting position and the ending position.
  • And the goal is to reuse the wasted storage we mentioned previously.
  • Let’s take a look at an example to see how a circular queue works. You should pay attention to the strategy we use to enqueue or dequeue an element

https://leetcode.com/explore/learn/card/queue-stack/228/first-in-first-out-data-structure/1396/

  • Review the animation carefully to figure out the strategy we use to check if a queue is empty or full.
  • For the next exercise, we will let you try to implement the circular queue by yourself and provide a solution later.

Design Circular Queue

  • Design your implementation of the circular queue.
  • The circular queue is a linear data structure in which the operations are performed based on FIFO (First In First Out) principle and the last position is connected back to the first position to make a circle.
  • It is also called “Ring Buffer”
  • One of the benefits of the circular queue is that we can make use of the spaces in front of the queue.
  • In a normal queue, once the queue becomes full, we cannot insert the next element even if there is a space in front of the queue.
  • But using the circular queue, we can use the space to store new values.
  • Your implementation should support following operations:
    • MyCircularQueue(k): Constructor, set the size of the queue to be k.
    • Front: Get the front item from the queue. If the queue is empty, return -1.
    • Rear: Get the last item from the queue. If the queue is empty, return -1.
    • enQueue(value): Insert an element into the circular queue. Return true if the operation is successful.
    • deQueue(): Delete an element from the circular queue. Return true if the operation is successful.
    • isEmpty(): Checks whether the circular queue is empty or not.
    • isFull(): Checks whether the circular queue is full or not.

Example:

MyCircularQueue circularQueue = new MyCircularQueue(3); // set the size to be 3
circularQueue.enQueue(1);  // return true
circularQueue.enQueue(2);  // return true
circularQueue.enQueue(3);  // return true
circularQueue.enQueue(4);  // return false, the queue is full
circularQueue.Rear();  // return 3
circularQueue.isFull();  // return true
circularQueue.deQueue();  // return true
circularQueue.enQueue(4);  // return true
circularQueue.Rear();  // return 4
  • Note:
    • All values will be in the range of [0, 1000].
    • The number of operations will be in the range of [1, 1000].
    • Please do not use the built-in Queue library.

C++ implement manually

class MyCircularQueue{
private:
  vector<int> data;
  int head;
  int tail;
  int size;
public:
  // initialize our data structure here. set the size of the queue to be k.
  MyCircularQueue(int k){
    data.resize(k);
    head = -1;
    tail = -1;
    size = k;
  }
  // Insert an element into the circular queue. Return true if the operation is successful.
  bool enQueue(int value){
    if (isFull()){
      return false;
    }
    if (isEmpty()){
      head = 0;
    }
    tail = (tail + 1) % size;
    data[tail] = value;
    return true;
  }
  bool deQueue(){
    if (isEmpty()){
      return false;
    }
    if (head == tail){
      head = -1;
      tail = -1;
      return true;
    }
    head = (head + 1 ) % size;
    return true;
  }

  // get the front item from the queue.

  int Front(){
    if (isEmpty()){
      return -1;
    }
    return data[head];
  }
  int Rear(){
    if (isEmpty()){
      return -1;
    }
    return data[tail];
  }

  /** Checks whether the circular queue is empty or not. */
  bool isEmpty() {
      return head == -1;
  }
  /** Checks whether the circular queue is full or not. */
  bool isFull() {
      return ((tail + 1) % size) == head;
  }
}

Queue - Usage

Queue - Usage(Library)

#include <iostream>

int main() {
    // 1. Initialize a queue.
    queue<int> q;
    // 2. Push new element.
    q.push(5);
    q.push(13);
    q.push(8);
    q.push(6);
    // 3. Check if queue is empty.
    if (q.empty()) {
        cout << "Queue is empty!" << endl;
        return 0;
    }
    // 4. Pop an element.
    q.pop();
    // 5. Get the first element.
    cout << "The first element is: " << q.front() << endl;
    // 6. Get the last element.
    cout << "The last element is: " << q.back() << endl;
    // 7. Get the size of the queue.
    cout << "The size is: " << q.size() << endl;
}

Moving Average from Data stream

  • Given a stream of integers and a window size, calculate the moving average of all integers in the sliding window.

example

MovingAverage m = new MovingAverage(3);
m.next(1) = 1
m.next(10) = (1 + 10) / 2
m.next(3) = (1 + 10 + 3) / 3
m.next(5) = (10 + 3 + 5) / 3

C++

class MovingAverage {    
public:
    // Initialize your data structure here.
    double runningTotal;
    unsigned int windowSize;
    std::queue<int> buffer;

    MovingAverage(unsigned int inputSize) {
//         initialize value
        runningTotal = 0.0;
        windowSize = inputSize;
    }

    double next(int inputValue) {
// check if buffer is full
        if (buffer.size() == windowSize)
        {
//             subtract front value from running total
            runningTotal -= buffer.front();
//             delete value from front of std::queue
            buffer.pop();
        }
//         add new value
        buffer.push(inputValue);
//         update running total
        runningTotal += inputValue;
//         calculate average
        return static_cast<double>(runningTotal / buffer.size());        
    }
};

/**
 * Your MovingAverage object will be instantiated and called as such:
 * MovingAverage* obj = new MovingAverage(size);
 * double param_1 = obj->next(val);
 */

static_cast

  • static_cast<바꾸려고 하는="" 타입="">(대상);
  • static_cast<new_type<(expression)
  • 실수와 정수, 열거형과 정수형, 실수와 실수 사이의 변환을 허용

Reference

https://leetcode.com/

Comment  Read more

Controller problem

|

Problem

Kin chain provided in model doesn’t contain standard UR joint ‘shoulder_lift_joint’

solution

change config in kinematic.yaml from moveit_config

robot1:
  kinematics_solver: trac_ik_kinematics_plugin/TRAC_IKKinematicsPlugin
  kinematics_solver_search_resolution: 0.005
  kinematics_solver_timeout: 0.005
  kinematics_solver_attempts: 3
  solve_type : Distance
robot2:
  kinematics_solver: trac_ik_kinematics_plugin/TRAC_IKKinematicsPlugin
  kinematics_solver_search_resolution: 0.005
  kinematics_solver_timeout: 0.005
  kinematics_solver_attempts: 3
  solve_type : Distance

Comment  Read more